A parking management system for managing the records of the incoming and outgoing vehicles in a parking house. It's easy for Admin to retrieve the data if the vehicle has been visited through a number. He can get that data.
Nowadays, in many public places such as malls, multiplex systems, hospitals, offices, and market areas, there is a crucial problem of vehicle parking. The vehicle parking area has many lanes/slots for car parking. So to park a vehicle, one has to look for all the lanes. Moreover, this involves a lot of manual labor and investment.
Instead of the vehicle caught in towing, the vehicle can park safely and securely at a low cost. A parking control system has been generated so that it is filled with many security devices such as parking control gates, toll gates, time and attendance machines, car counting systems, etc.
These features are hereby very necessary nowadays to secure your car and also to evaluate the fee structure for the entry of every vehicle and exit. The objective of this project is to build a Vehicle Parking management system that enables the time management and control of vehicles using number plate recognition.
The system will track the entry and exit of cars, maintain a listing of cars within the parking lot, and determine if the parking lot is full or not. It will determine the cost per vehicle according to their time consumption.
In the modern age. Many people have vehicles. The vehicle is now a basic need. Every place is in the process of urbanization. There are many corporate offices and shopping centers etc. There are many recreational places where people used to go for refreshments. So, all these places need a parking space where people can park their vehicles safely and easily. Every parking area needs a system that records the detail of vehicles to give the facility. These systems might be computerized or non-computerized. With the help of a computerized system, we can deliver a good service to a customer who wants to park their vehicle on any organization's premises.
A vehicle parking management system is an automatic system that delivers data processing at a very high speed in a systematic manner. Parking is a growing need of the time. The development of this system is very useful in this field area. We can sell this system to any organization. By using our system, they can maintain records very easily. Our system covers every area of parking management. In the coming future, there will be an excessive need for Vehicle parking management systems.
The Project will consist of 2 modules:
Module 1: Setup, Installation and System Design
Module 2: Management Module
Microsoft Visual Studio is an integrated development environment (IDE) from Microsoft. It is used to develop computer programs for Microsoft Windows, as well as websites, web applications, and web services. Visual Studio uses Microsoft software development platforms such as Windows API, Windows Forms, Windows Presentation Foundation, Windows Store, and Microsoft Silverlight. It can produce both native code and managed code.
Visual Studio includes a code editor supporting IntelliSense (the code completion component) and code refactoring. The integrated debugger works both as a source-level debugger and a machine-level debugger. Other built-in tools include a forms designer for building GUI applications, a web designer, a class designer, and a database schema designer. It accepts plug-ins that enhance the functionality at almost every level—including adding support for source-control systems (like Subversion) and adding new toolsets like editors and visual designers for domain-specific languages or toolsets for other aspects of the software development lifecycle (like the Team Foundation Server client: Team Explorer).
Microsoft SQL Server is a relational database management system developed by Microsoft. As a database server, it is a software product with the primary function of storing and retrieving data as requested by other software applications—which may run either on the same computer or on another computer across a network (including the Internet).
Microsoft markets at least a dozen different editions of Microsoft SQL Server, aimed at different audiences and for workloads ranging from small single-machine applications to large Internet-facing applications with many concurrent users
| SYSTEM RAM | 1.00GB and Above |
| FRONT END | VISUAL STUDIO |
| BACK END | SQL SERVER |
1. Java Development Environment: You must have a Java development environment installed on your computer, such as Eclipse, NetBeans, or IntelliJ IDEA. Ensure you have the latest version of the Java Development Kit (JDK) installed.
2. Database Management System: You will need a database management system to store and manage data related to parking spots, vehicles, and payments. MySQL, PostgreSQL, or Oracle are common options.
3. Frameworks and Libraries: You may want to use frameworks and libraries that can help speed up the development process, such as Spring Framework, Hibernate, or Apache Struts.
4. User Interface: A graphical user interface (GUI) is essential for a parking management system. You can use JavaFX, Swing, or AWT to create the GUI.
5. Payment Gateway Integration: You may need to integrate a payment gateway into the system to enable online payments. PayPal, Stripe, and Braintree are some popular payment gateways that you can integrate.
6. Security and Authentication: You will need to ensure the system is secure and requires proper authentication to prevent unauthorized access to the system. Using security libraries like Spring Security or Apache Shiro can help.
7. Testing Tools: Use testing tools such as JUnit or TestNG for unit testing and integration testing, to ensure that the system is functioning as expected
Details: This Module consists of tasks to set up and install various tools and libraries we will need for the project.
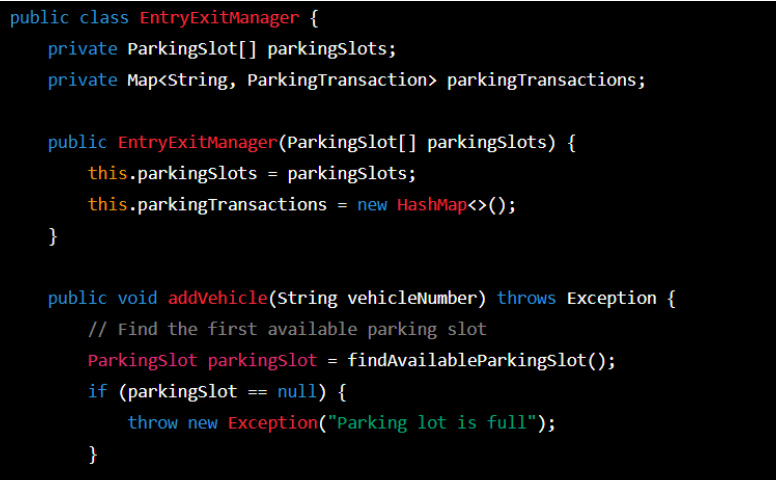
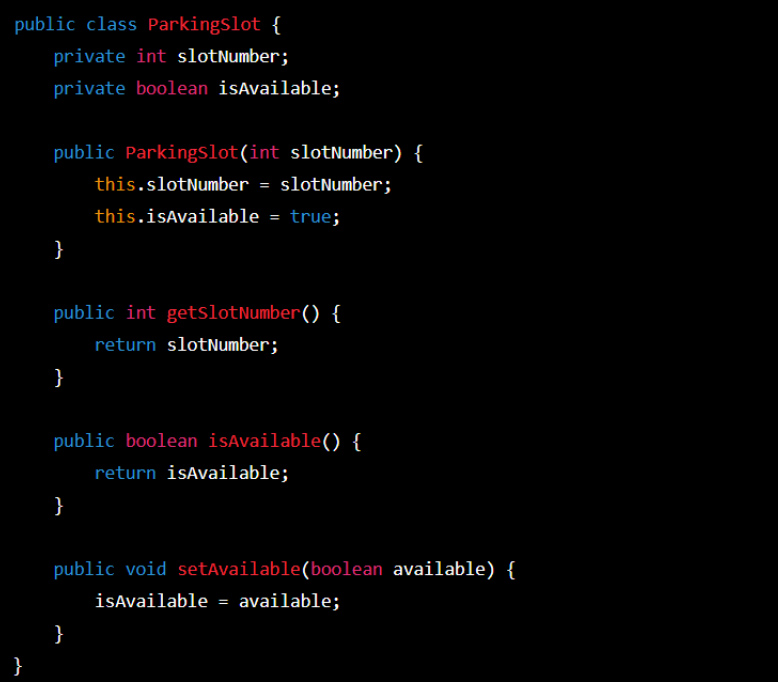
The module could include a Java class to represent an EntryGate object, which would be responsible for managing the entry of vehicles into the parking facility. The EntryGate object could be designed to interface with various sensors and devices, such as ticket dispensers, license plate recognition systems, and payment processing systems.
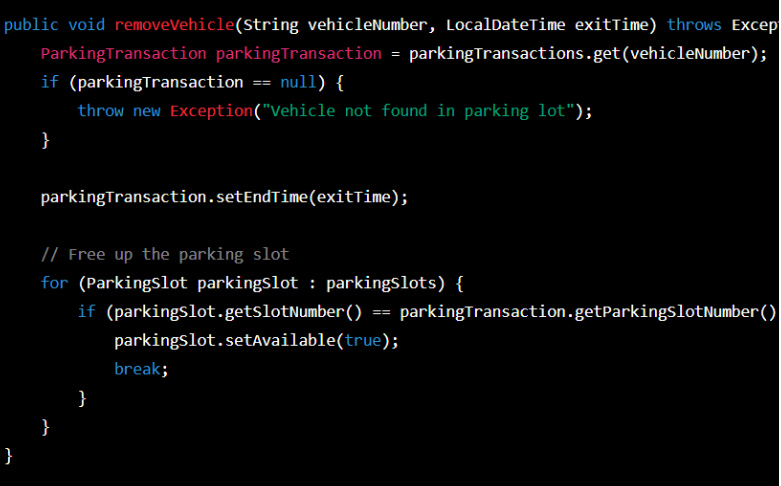
The module could also include a Java class to represent an ExitGate object, which would be responsible for managing the exit of vehicles from the parking facility. The ExitGate object could be designed to interface with similar sensors and devices as the EntryGate object.
To implement real-time monitoring of parking occupancy and availability, the module could include a Java class to represent a ParkingMonitor object, which would be responsible for keeping track of the current occupancy of parking spaces and updating a display board or dashboard in real-time.
Each module is to be completed in one week. Submissions will be on a weekly basis. Module 1 submission is to be done in the first week, and module 2 submission in the next consecutive week.
1. Compile and test your project: Make sure that your project is error-free and runs smoothly. Test all the functionalities thoroughly and ensure that they meet the requirements.
2. Create a project report: Create a report that documents your project's scope, objectives, requirements, design, implementation, and testing. Your report should also include screenshots, diagrams, and code snippets to provide a better understanding of your project.
3. Zip your project: Once your project is ready, compress it into a ZIP file. Make sure that the ZIP file contains all the necessary files, including the source code, project report, and any other resources used.
For module 1, you must submit the files as mentioned below:
1. Setup and Installation Code - .zip format or GitHub URL
2. Project source code - .zip format or GitHub URL
3. CSV file for all the datasets
For module 2 you have to submit the files in a zip folder as mentioned below:
1. Source code - .zip format or Github URL
2. JS script code details
3. Screenshot of the designed project UI after completion
| Day | Date | Time | Session |
|---|---|---|---|
| Monday | 20th February | 6:00 PM PST | Project Kickoff Call/ Introduction to Module 1 |
| Sunday | 26th February | 6:00 PM PST | Module 1 Submission Deadline |
| Monday | 27th February | 6:00 PM PST | Introduction to Module 2 |
| Sunday | 5th March | 6:00 PM PST | Module 2 submission Deadline |
| Wednesday | 8th March | 6:00 PM PST | Top Teams Announcement |
*Any changes in the dates and time of the sessions will be informed in advance.
1. Data Live Project Kick Off/ Introduction Session: Click here
2. Module Submission google form: Click here
3. Live Project Doubts and queries form: Click here
4. Introduction to Module 2: TBA